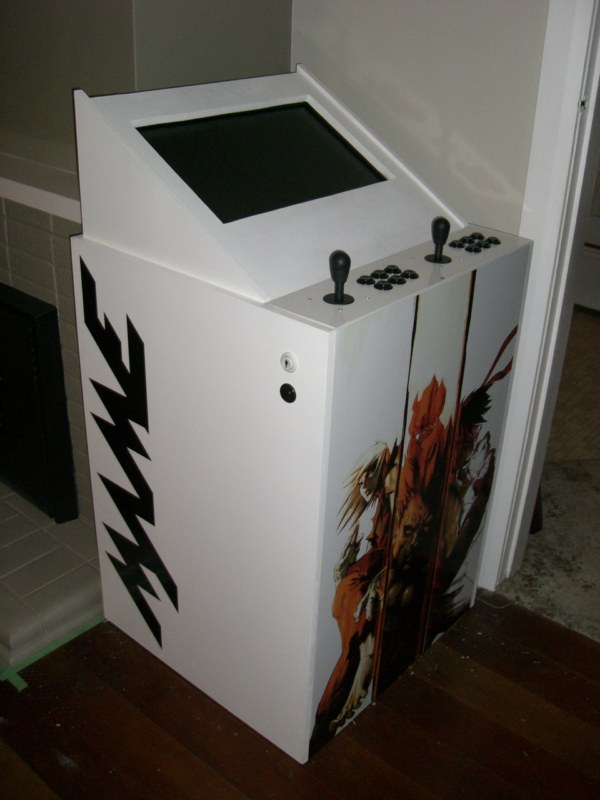
This is the second MAME powered arcade machine I have built, I used 18mm MDF for the cabinet and built it originally to have a 32″ CRT TV mounted in it but when I went to install it the TV was broken so I decided to fork out for a 24″ LCD instead. The downside of using an LCD meant I had to change the angle the screen was mounted at otherwise the colours looked odd.
It is powered by a cheap $40 P4 3.0GHZ machine which has 512mb of RAM, this doesn’t seem like much but it is adequate for running all the old school arcade games from my childhood such as street fighter 2 hyper fighter.
As you can see I placed caster wheels on the bottom so it was easy to move around the house. The back wheels do not turn but the front ones can swivel freely.
I decided to go with a clean black and white theme for the machine which meant it would fit in with my house decor more then a bright yellow or other traditional arcade colour.
For the controls I originally wired it manually with a hacked game-pad but I had issues where buttons would stop working so I swapped it out for a keyboard encoder and never looked back, it was worth the extra cash.
Luckily I work for a road sign company so I was able to get the graphics printed/cut cheaply which once applied really made the machine stand out.
I have since sold this machine in preparation of a new build I am planning but never seem to get around to.

![CIMG1328 [800x600]](http://www.kotik.co.nz/wp-content/uploads/2012/04/CIMG1328-800x600-300x225.jpg)
![CIMG1332 [800x600]](http://www.kotik.co.nz/wp-content/uploads/2012/04/CIMG1332-800x600-300x225.jpg)
![CIMG1339 [800x600]](http://www.kotik.co.nz/wp-content/uploads/2012/04/CIMG1339-800x600-225x300.jpg)
![CIMG1370 [800x600]](http://www.kotik.co.nz/wp-content/uploads/2012/04/CIMG1370-800x600-225x300.jpg)
![CIMG1341 [800x600]](http://www.kotik.co.nz/wp-content/uploads/2012/04/CIMG1341-800x600-300x225.jpg)
![CIMG1367 [800x600]](http://www.kotik.co.nz/wp-content/uploads/2012/04/CIMG1367-800x600-300x225.jpg)
![CIMG1369 [800x600]](http://www.kotik.co.nz/wp-content/uploads/2012/04/CIMG1369-800x600-225x300.jpg)
![CIMG1368 [800x600]](http://www.kotik.co.nz/wp-content/uploads/2012/04/CIMG1368-800x6001-225x300.jpg)
![CIMG1371 [800x600]](http://www.kotik.co.nz/wp-content/uploads/2012/04/CIMG1371-800x600-300x225.jpg)


Hi Scott,
I’m just doing some googling looking for graphics to use on a MAME cabinet I’m planning and came across your great example. I was just wondering if you could tell me where you came across that great Street Fighter picture?
Cheers!
Joel
Hi Joel,
I found this image which you could use, sorry I don’t have the image saved but I blew it up in Photoshop to suit the size required and then cleaned it up a bit so it wasn’t grainy.
http://tinyurl.com/ngqtmxs
Awesome machine! Very jealous – well done! Looks really practical! How long I’d it take you to build and do you know approximately how much all the parts cost you? How much did you end up selling it for?
Cheers. It cost about six hundred or so to build and yes I sold it for about fifteen hundred. I got the MDF cut to size at bunnings as they do free cuts and assembly only took a few hours. The painting, wiring and computer setup took the longest. It was a fun project and I would like to build another maybe using a raspberry pi next time.
Thanks for the reply!
You wouldn’t happen to have the plans still would you?
Thinking about giving it a try myself….how did you hold the monitor in place and what is the plastic piece that you put over the joysticks and buttons?
Sorry for the late reply I just saw the comment. No sorry, it was 1000mm high by 600mm deep and 636mm wide (600panel plus 18mm thickness on each side). The top part I just made to suit based upon the viewing angle of the LCD screen.
To hold the monitor I used some thin metal strapping that was screwed into the MDF, worked well and as it was not viewable I didn’t really care that it was a bit ugly.
The control panel was 5mm metal, no sure which plastic parts you are talking about but everything around the controls came with them.
Good luck for your build.